EclipseでMavenのプロジェクトにSpringとJSPを設定する
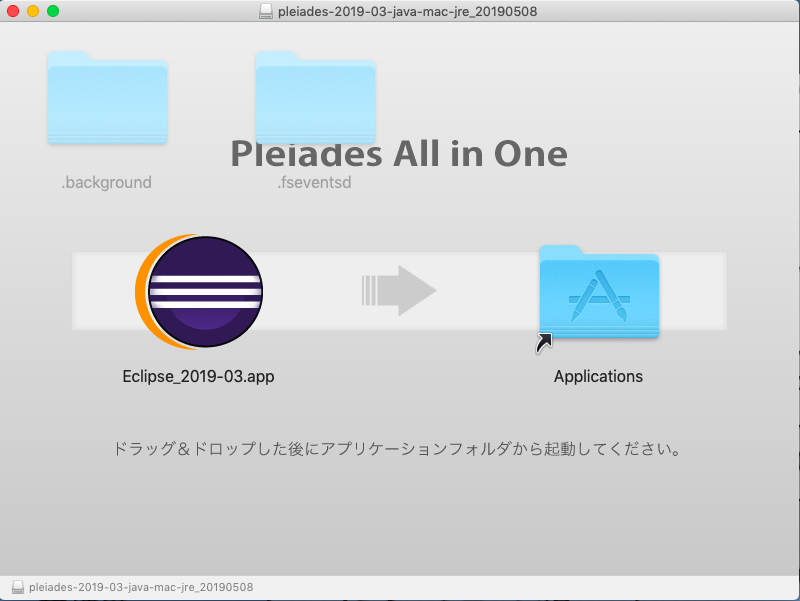
- Eclipseをインストールします
- Mavenプロジェクトを作成します。
- Eclipseの設定をします。
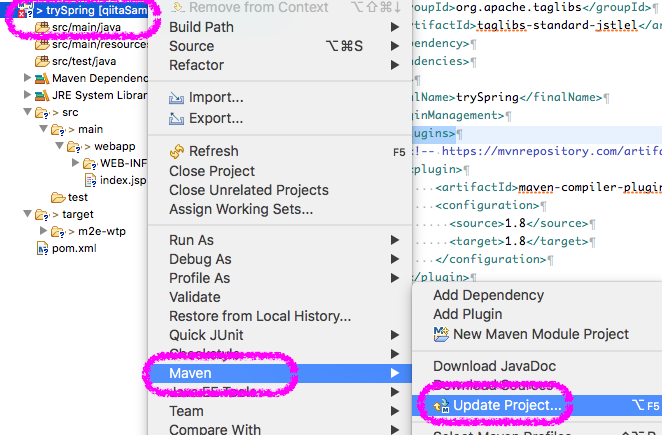
- Spring をpom.xmlに設定します。
- Web.xmlを編集します。
- 次は、Tomcatを設定します。
- 困った
- 出典
Eclipseをインストールします

Mavenプロジェクトを作成します。
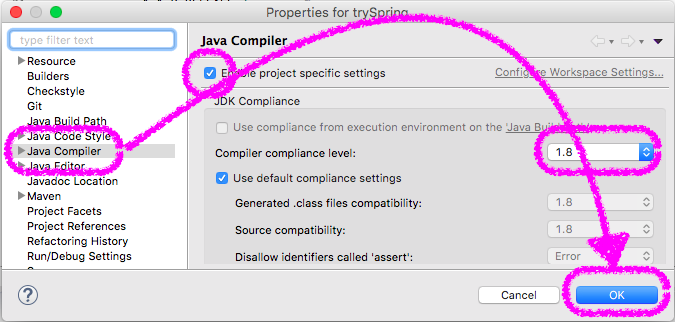
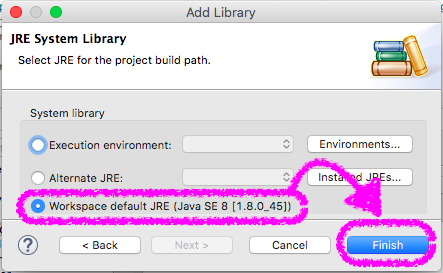
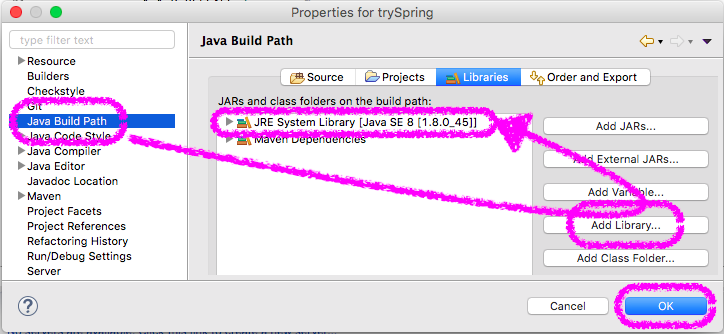
Eclipseの設定をします。
Eclipseのデフォルトを使用しない場合に設定を行います。
- 環境
Workspace全体の設定
Spring をpom.xmlに設定します。
pom.xmlって何?
Mavenは、Project Object Modelに基づいたプロジェクト管理ツールです。
Project Object Modelを略すとPOMです。
pom.xmlにはプロジェクトの情報を設定します。
pom.xmlに依存関係を設定します。
pom.xmlに設定する
必要なタグがない場合は保管機能を使って追記します。
Spring IO Platformの dependencyManagement 定義をインポートして依存ライブラリのバージョンを管理します。
- 以下定義を project の dependencyManagement の dependencies に追記します。
<!-- https://mvnrepository.com/artifact/io.spring.platform/platform-bom -->
<dependency>
      <!-- Spring IO Platformは、Springのアプリ開発・実行で必要な各種ライブラリやサードパーティライブラリのバージョンを決定し、依存関係を解決するためのSpringサブプロジェクトです。 -->
    <groupId>io.spring.platform</groupId>
    <artifactId>platform-bom</artifactId>
    <version>2.0.8.RELEASE</version>
    <type>pom</type>
    <scope>import</scope><!-- 追記します。 -->
</dependency>
Servlet APIのjarを依存ライブラリとして指定します。
- jarを依存ライブラリに追加すると src/main/webapp/index.jsp で発生していたエラーを解消できます。
- 以下定義を
の に追記します。
<!-- https://mvnrepository.com/artifact/javax.servlet/javax.servlet-api -->
<dependency>
    <groupId>javax.servlet</groupId>
    <artifactId>javax.servlet-api</artifactId>
    <version>4.0.1</version><!-- バージョンはSpring IO Platformで管理されているバージョンが適用されるので削除します。 -->
    <scope>provided</scope>
</dependency>
JSP Standard Tag Library(JSTL)のjarを依存ライブラリとして指定します。
- jarを依存ライブラリに追加することでJSPの実装を手助けしてくれるタグを利用できるようになります。
- 以下定義を
の に追記します。
<!-- https://mvnrepository.com/artifact/org.apache.taglibs/taglibs-standard-jstlel -->
<dependency>
    <groupId>org.apache.taglibs</groupId>
    <artifactId>taglibs-standard-jstlel</artifactId>
    <version>1.2.5</version><!-- バージョンはSpring IO Platformで管理されているバージョンが適用されるので削除します。 -->
</dependency>
コンパイルするソースファイルとコンパイルして出力するJavaの互換バージョンを指定します。
- 以下定義を
の の の に追記します。
<!-- https://mvnrepository.com/artifact/org.apache.maven.plugins/maven-compiler-plugin -->
<dependency><!-- <plugin>タグに変更します。 -->
    <groupId>org.apache.maven.plugins</groupId><!-- 削除します。 -->
    <artifactId>maven-compiler-plugin</artifactId>
    <version>3.7.0</version><!-- バージョンはSpring IO Platformで管理されているバージョンが適用されるので削除します。 -->
       <configuration><!------ ▼追記します。 --->
              <source>1.8</source><!--- プロジェクトの[Javaコンパイラー]に設定したバージョンを指定します。 --->
              <target>1.8</target><!--- Java8を指定します。 --->
       </configuration><!--- プロジェクトの[Javaコンパイラー]に設定したバージョンを指定します。 --->
</dependency><!-- </plugin>タグに変更します。 -->
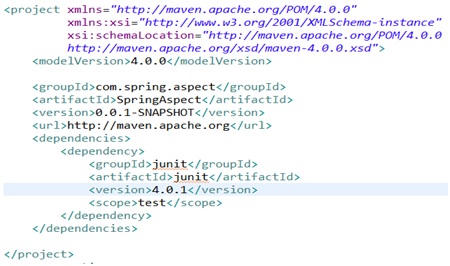
書き終わったpom.xml
<project xmlns="http://maven.apache.org/POM/4.0.0" xmlns:xsi="http://www.w3.org/2001/XMLSchema-instance"
  xsi:schemaLocation="http://maven.apache.org/POM/4.0.0 http://maven.apache.org/maven-v4_0_0.xsd">
  <modelVersion>4.0.0</modelVersion>
  <groupId>com.qiita.ponsuke0531</groupId>
  <artifactId>trySpring</artifactId>
  <packaging>war</packaging>
  <version>0.0.1-SNAPSHOT</version>
  <name>trySpring Maven Webapp</name>
  <url>http://maven.apache.org</url>

  <dependencyManagement>
    <dependencies>
      <!-- https://mvnrepository.com/artifact/io.spring.platform/platform-bom -->
      <dependency>
        <groupId>io.spring.platform</groupId>
        <artifactId>platform-bom</artifactId>
        <version>2.0.8.RELEASE</version>
        <type>pom</type>
        <scope>import</scope>
      </dependency>
    </dependencies>
  </dependencyManagement>

  <dependencies>
    <dependency>
      <groupId>junit</groupId>
      <artifactId>junit</artifactId>
      <scope>test</scope>
    </dependency>
    <!-- https://mvnrepository.com/artifact/javax.servlet/javax.servlet-api -->
    <dependency>
      <groupId>javax.servlet</groupId>
      <artifactId>javax.servlet-api</artifactId>
      <scope>provided</scope>
    </dependency>
    <!-- https://mvnrepository.com/artifact/org.apache.taglibs/taglibs-standard-jstlel -->
    <dependency>
      <groupId>org.apache.taglibs</groupId>
      <artifactId>taglibs-standard-jstlel</artifactId>
    </dependency>
  </dependencies>
  <build>
    <finalName>trySpring</finalName>
    <pluginManagement>
      <plugins>
        <!-- https://mvnrepository.com/artifact/org.apache.maven.plugins/maven-compiler-plugin -->
        <plugin>
            <artifactId>maven-compiler-plugin</artifactId>
            <configuration>
              <source>1.8</source>
              <target>1.8</target>
            </configuration>
        </plugin>
      </plugins>
    </pluginManagement>
  </build>
</project>
Web.xmlを編集します。
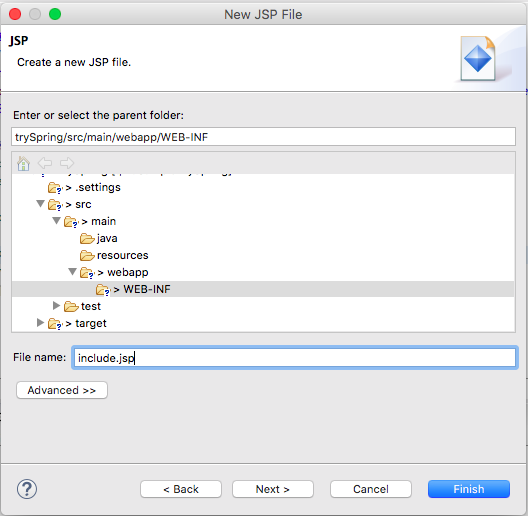
- src/main/webapp/WEB-INF/web.xml を開きます。
(必要があれば)動的Webモジュールのバージョンをプロジェクト指定に変更します。
<web-app xmlns="http://java.sun.com/xml/ns/javaee"
    xmlns:xsi="http://www.w3.org/2001/XMLSchema-instance"
    xsi:schemaLocation="http://java.sun.com/xml/ns/javaee http://java.sun.com/xml/ns/javaee/web-app_3_0.xsd"<!--ここ-->
    version="3.0"><!--ここ-->
JSPを設定します。
<?xml version="1.0" encoding="UTF-8"?>
<web-app xmlns="http://java.sun.com/xml/ns/javaee"
    xmlns:xsi="http://www.w3.org/2001/XMLSchema-instance"
    xsi:schemaLocation="http://java.sun.com/xml/ns/javaee http://java.sun.com/xml/ns/javaee/web-app_3_0.xsd"
    version="3.0">
  <jsp-config>
    <!-- JSPに関する共通的な定義. -->
    <jsp-property-group>
      <url-pattern>*.jsp</url-pattern>
      <!-- JSPファイルの文字コード指定. -->
      <page-encoding>UTF-8</page-encoding>
      <!-- 各JSPファイルの先頭にインクルードするJSPファイルの指定. -->
      <include-prelude>/WEB-INF/include.jsp</include-prelude>
    </jsp-property-group>
  </jsp-config>
</web-app>
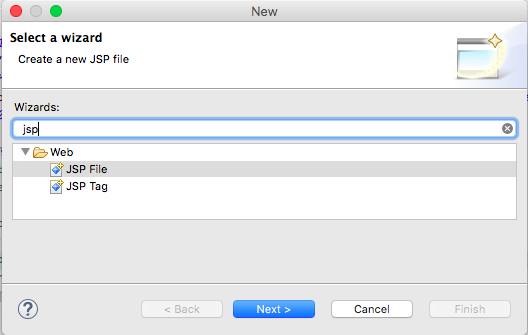
web.xmlで指定したJSPファイルを作成して JSP Standard Tag Library(JSTL) のtaglib定義を追加します。
taglibの定義を追加することで、どのJSPからもJSTLのtaglibが利用できるようになります。
<%@ taglib prefix="c" uri="http://java.sun.com/jsp/jstl/core" %>
<%@ taglib prefix="fmt" uri="http://java.sun.com/jsp/jstl/fmt" %>
<%@ taglib prefix="fn" uri="http://java.sun.com/jsp/jstl/functions" %>